
This series of blog posts which I have converted from Youtube videos. I personally have really enjoyed these videos so in order to textually document them, these are essentially some screenshots and rough notes organised.
This particular post is based on the awesome KARA ERICKSON NGConf 2016 talk. It can be found on the link https://www.youtube.com/watch?v=kM5QBOWrUVI
What is form validations? Whenever a user goes on a form to enter some information, the data validation rule comes into play to check whether or not they are entering the information in the format that it is required.

And based on the validations configured on the control, an error message is displayed accordingly to guide the user where they are going wrong. So at the back is basically a validator function running that assess the inputs and decides whether to map it as a validator error or return a null.
Setting up everything up properly
So let’s take a demo of setting up a validation to get a basic idea of how it really works. Consider a web page say, for bids, that takes input a name and a bid from the user and displays it on the left panel. So let us set up in the code that we require name and bids. And add the corresponding errors to it.

Okay so if you see on the page since we have not typed anything yet, errors are there. As soon as we enter values for both name and bid, the errors disappear. Alright, now it sort of looks unattractive and not fit to be an actual form so let’s add a few style factors to make it look more appealing. If you right click on the input panel and click inspect element and then check the style formatting, and here you can see ng-dirty and ng-touched. We can edit them and add styles so that when the values are valid, the input bar turns green and if it isn’t then it turns red. Okay now let’s check, and yes that works.
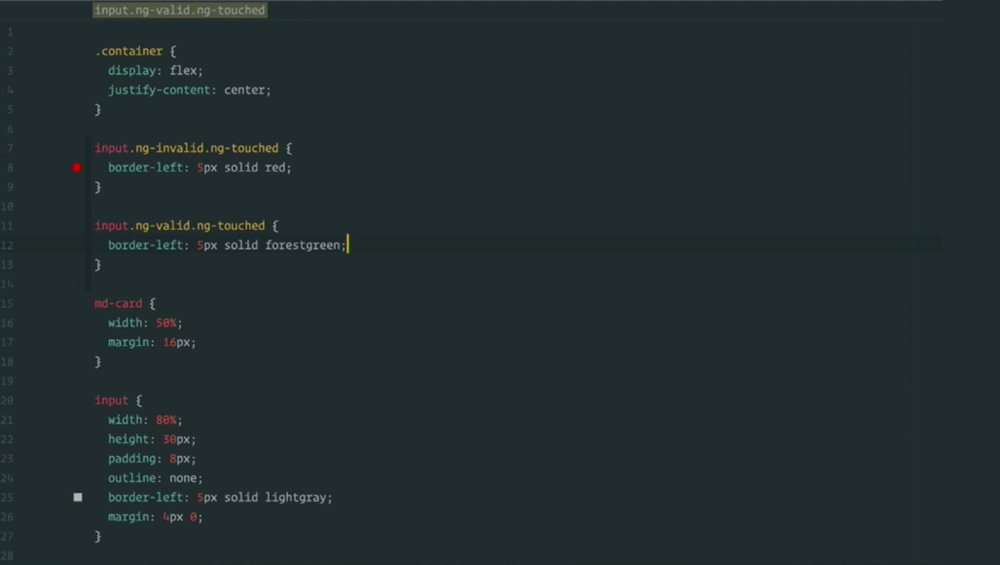

Now let’s make another change. Currently, the errors are being simply printed out. So let’s change it to appearing only when an invalid value is entered. So if the name is invalid and the box is touched, then we show the error for the name is required. And similarly for bid. Alright so since this is a bidding website, we would want to make sure that every bid that comes is greater than the latest bid to ensure that someone doesn’t bid $3 when the highest bid is around $200. So in the type script, we can create a function for minimum bid that will check whether or not the bid entered is greater than the last one we received. If it is then we are good, otherwise, it will display an error on what the bid really should be.
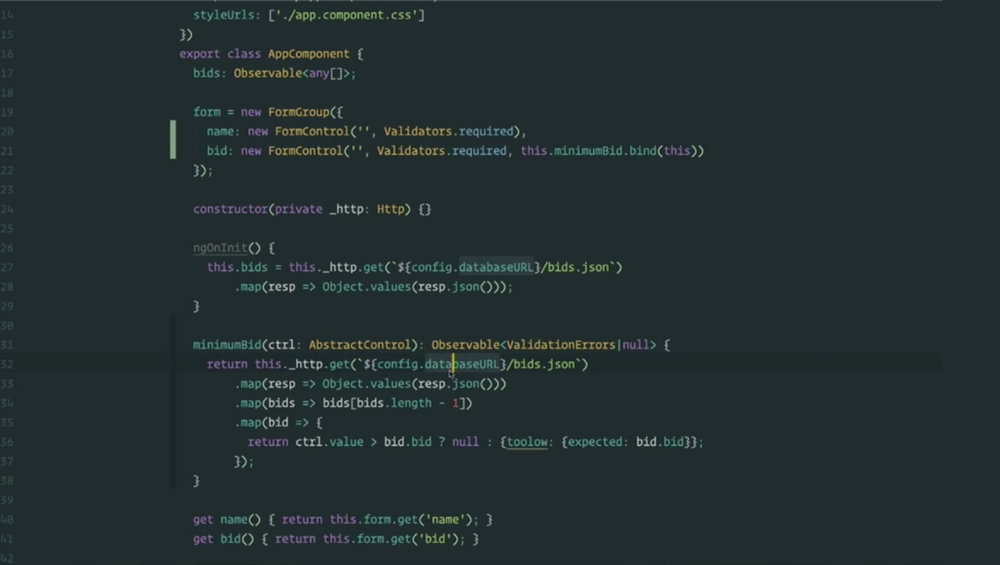

So since we have two errors related to bids, so we need to specify which one appears when. Also, you can customize the error message to show how low was the entered bid and what the minimum bid was at the time of bidding. So you can check on the web page and you will find that the modified script works pretty well.
Understanding the Error Cycle
So let’s consider a more concrete version to help you understand the flow of the error cycle. When a user enters a value, firstly it goes through to form control which checks initially whether the value is required or not. When no value is entered the first check displays an error that the value is required.

Whereas, when you enter a bid then the first check clears and the next one comes whether the bid is more than the minimum bid. Since our last bid was $12 and if we enter $3 here, we will receive an error. If we add 1 to it, then both our validations will pass off as null and no error will be displayed. So the flow goes as firstly form control, then sync errors and then finally to async errors. So we can visualize our entire validation process as a marble diagram of observable streams that are being transformed over time.

We can understand how each stream is being mapped to the other. The value stream is mapped to the form control, which is mapped on to the sync errors and that is finally mapped on to the async errors. We can then identify where the errors are being emitted in the streams.

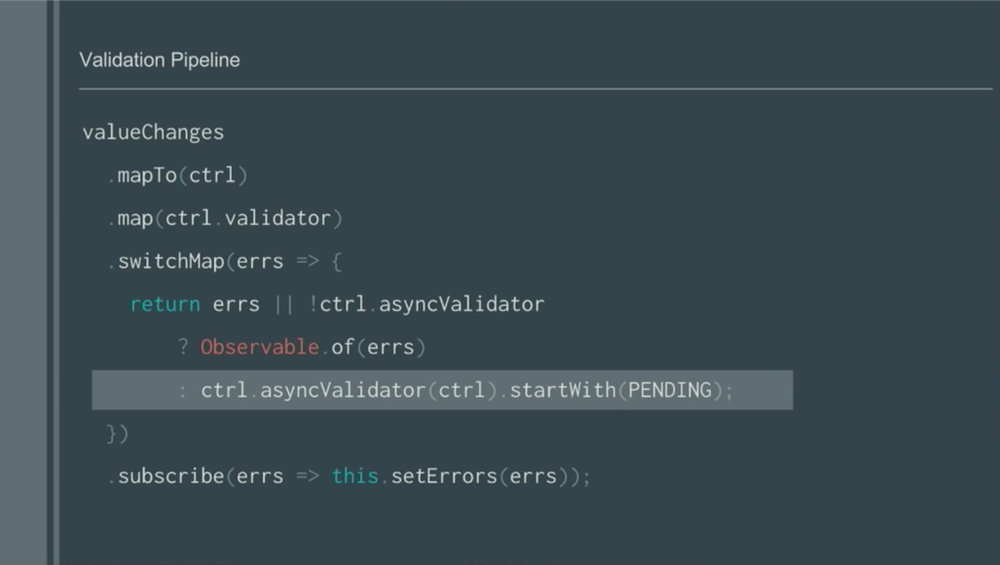
In the pseudo code, you can see how it works, how mapping is done through switchmap for every time the results in the validation are either null or error set. You can add a pending status here as well, by adding the token with asyncvalidator. You can use startwith() along with pending so the pending status is passed on immediately and when the database responds with the matching, it can then override the pending rule.
More Features to Unlock
Let’s understand why visualizing the stream pipeline was actually important. The whole point is that it opens up the floodgates to many features that have been requested by the community. Some of which are as follows:

-
Custom Validator chains:
The chain we just got through that led from forms to validators and syncs to finally asyncs, was a default chain. With custom validator chains, you can set up your own chain as per the requirement of the application using the let() function.
-
Control order and timing validation:
Using the let() function developers can set up their own validator chains and therefore control the timing as well as order of their validation easily. Your application will be able to decide for itself from the time the value is changed to when the status is set up.

-
Emit errors whenever your application requires:
How frequent or seldom your application emits errors is now also under your control.
Push Based Validation
The last thing to show you is how to push based validation can work. Let’s first switch from HTTP to AngularFire, and the list of observable is also made firebase list.
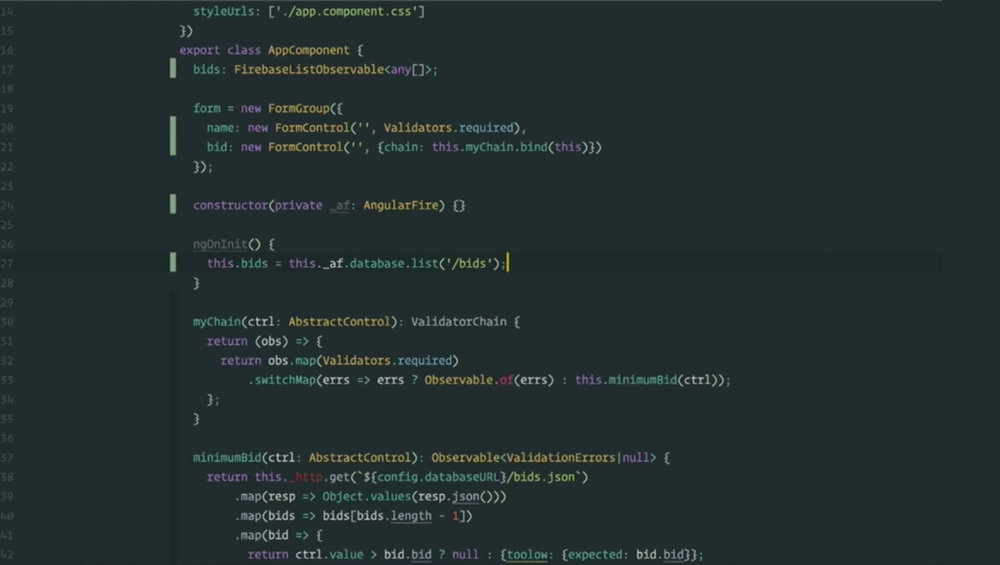
So what we are going to do is switch from getrequest, by removing it, to this.bid which is observable from angularfire which emits whenever the value of the bid array changes. So based on the changes we made here, now if two users are entering bid details say ng conf1 and ng conf2, and first one writes $20 bid and the second one writes $21 bid.

Now if ng conf2 posts the bid first, before ng conf1, then since we are streaming the errors in real time, ng conf1 will immediately receive an error that the bid is too low. You can check out more resources from the links provided to learn more about the new features and all.