This series of blog posts which I have converted from Youtube videos. I personally have really enjoyed these videos so in order to textually document them, these are essentially some screenshots and rough notes organised. 
Front-end frameworks by themselves do not really care about authentication.
Front-end frameworks are frameworks which power public clients. The public clients, as the name suggests are just public. It cannot have any kind of real sense of authentication in a traditional manner.
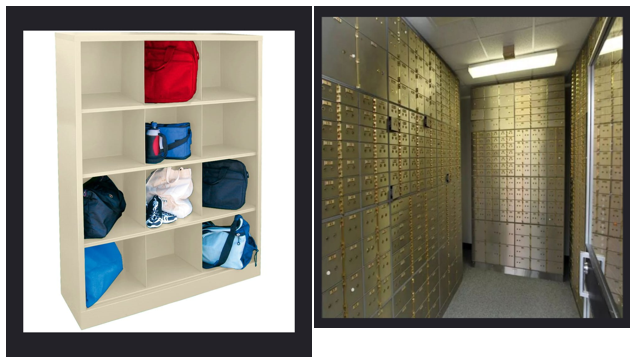
One of the ways to think about it is, the things one would want to protect. The person would not display it on a shelf in public. Instead, what is required, is the locker system, to keep it protected.
Characteristics of an authenticated round trip app
It is required that the users get the access to restricted pages and different views and routes. The privileged data which should be accessed by the users only. The information which is very specific to that user.
These are the goals of authentication.
How are these things protected? In a round trip setting it is a side effect of how to round-trip apps work.
Traditional authentication

This is how it looks like in round-trip sense.
The user would submit their credentials which get checked against the database. If everything turns out to be good, a session gets created on the server for them and a cookie gets sent back to the browser where it is stored.
It lines up with the session ID. That session on the server is an in-memory piece of data which identifies a user and then on a subsequent request or every movement forward through the app, that cookie gets sent to the server. It gets checked against that session and if everything turns to be good, then the user gets some content back.

That content is going to be HTML altogether, ready to go. And if some issue occurs in between, the user gets back an error.
Single page apps
What about Single Page Apps? In the single page app, the client is the dominant player. So there might be an app running in the browser and that app might make calls to an API or multiple APIs. The server sends back the response as JSON.
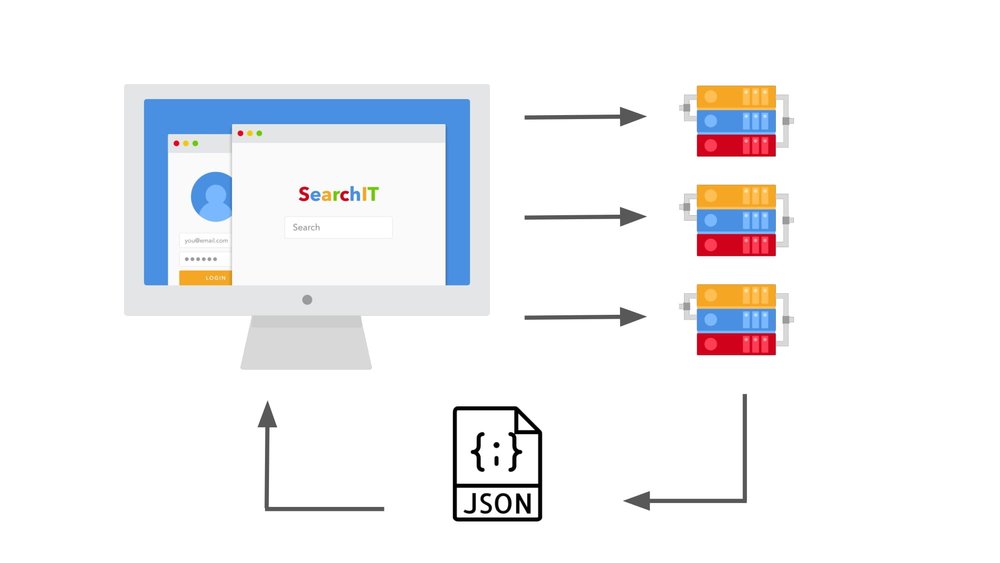
In single page apps, almost everything happens on the client. Most for the App’s architecture is downloaded to the browser on the initial page load. In the single page app, the architecture dictates that there is no full page reload.
If a secure data is pulled on that initial render then it exists in the browser.
Characteristics of an authenticated single-page app
They are similar to the characteristics of authentication of any other app. It is required that the users get the access to restricted pages and different views and routes. The privileged data which should be accessed by the users only. The information which is very specific to that user.
The app must never be initialized with anything which should only be accessed with proper authorization. This is because everything on the client is public.
The practice is to keep the secure data on the server and then only call it when it is known that the user is authorized.
There are many different ways to do it. One way is through JSON web tokens.
Stateless authentication with JWT
The JSON web tokens are actually a string.
Anatomy of JWT
The image shown below is a very basic JSON web token. There are three parts here. Each of them is separated by dots which represents different things.

There is a header which is a JSON object, which describes the token. There is payload which is like the meat of the token, this is where any user-specific data would go. The last thing is the Signature portion. The signature is made up by base64URL encoding the header and the payload together. Running that through a hash gives a signature which is tied specifically to this token and its contents.
If a person gets a hold of their token and tries to modify it, it will not be possible, cos as soon as they have tried this, the token will be invalidated.
JWT authentication in practice
JSON web token authentication- it looks similar to the round trip app.
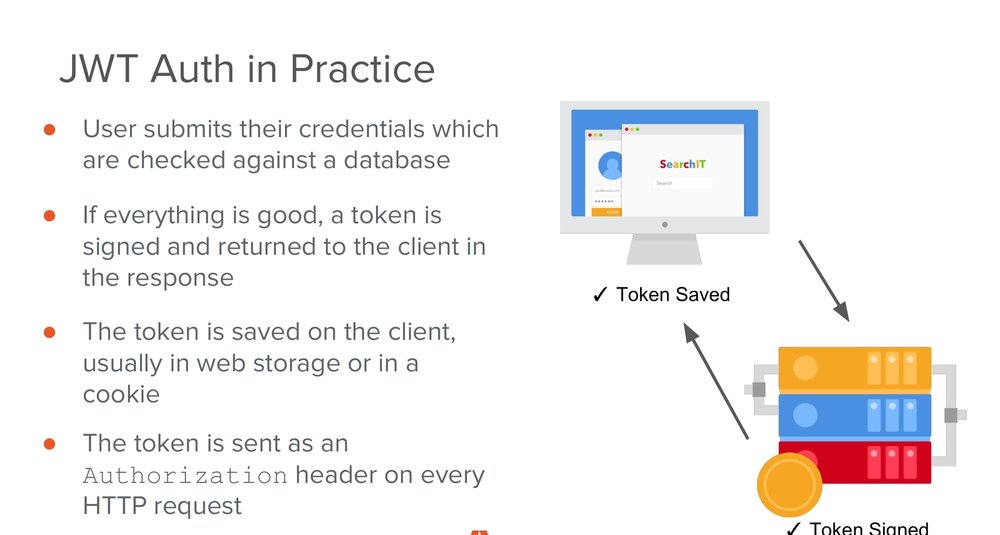
The users will submit their credentials which get checked against the database. But this time, if everything turns out to be good, an adjacent web token gets signed and sent back to the browser.
This is usually stored in web storage, local storage or in a cookie. The automatic transferring cookie back to the server. If the memory is stored in local storage, the JSON web token needs to be attached as an authorization header to every outgoing HTTP request which is made.
In order to authenticate a single page app, the client really needs to remain unaware of the contents of any kind of sensitive data that will be used. It becomes important to rely on the data which is provided from somewhere else.
Single page app authentication tasks
There are three things which might be done. The first one is to be able to modify HTTP requests to include the authentication information in the form of adding an authorization header to outgoing requests.
The header should contain a JSON web token. The access to the client-side routes needs to be limited. And it will be able to redirect the users to a public route, maybe, a login screen or a public homepage, when they become unauthenticated.
The angular platform has some really cool features built into it, which helps in doing such things.
HTTP Interceptors
The HTTP interceptors did not arrive until the version 3 or 4. Without the version 4, this process was supposed to be done manually- kind of attaching a header on every request that would be made.
The interceptors, here, is used to catch any outgoing HTTP requests, modify that header and then send them on their way.
Pull in the HTTP interceptors, provider token. Use the class which is going to be made, to describe some logic of how that modification is required to be made.
The modification will be described and in this manner, it would create an injectable service, the HTTP interceptor interface would be implemented. After it is done, it is important to provide the method, called intercepts. It will take a request and let the developer do some work on it. The HTTP requests with angular are immutable so instead of modifying every request which goes.
The first step is to clone it and then send the clone out the door.
In this example, it is cloned and authorization header.
It is really useful for caching authorization errors. For instance, there is a case where the user’s token becomes expired and the check is made on the server.
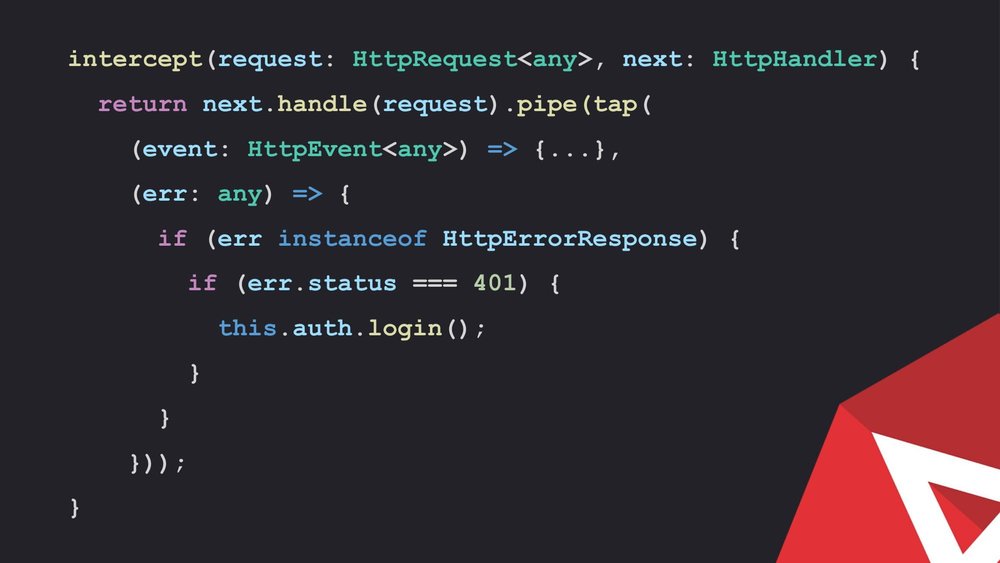
It returns a 401 error code. It can be looked into the interceptors, which takes care of the responses.
Route Grounds
Routh guards are also services. With these, we can tell the app to run, when the user requests a route, it will be essential to use route guards when the requirement is to restrict the access to certain routes.
There are 2 common ways to decide whether or not a user should have access to a route. The most common way is; are they authenticated? Are they logged in at all?
Another common way is; does the user have the appropriate office authorization level? So, if they are logged in, or they require a specific scope or they need a specific access level to be authorized to access a certain action.
Route guards can be applied at on a per route basis. This is particularly useful if there is an app which has multiple authorization levels.
Route guards implement a few different guard interfaces. The most common one is; CanActivate and this one is the one which will be generated automatically if it is ng generated with the CLI. The CanActivate interface will prevent authorization users from accessing a route.
An important thing about this is that the code for the route is actually already in the browser. The guards are preventing the UI from loading. The CanActivate Child interface is similar to the first one, but it can be applied to the parent route and it will then affect all of that parent route’s children. The CanLoad interface is a bit different than the prior two. This one was intended to be used with lazy loaded modules. This one will prevent the lazy loaded model from downloading to the browser at all if the user does not fulfil the conditions.
Here is an example of route guard implementing which can activate interface. If there is any injectable service.
The guards return true or false depending on the whether the user requires access. So some condition will be set which will help in determining if the user fulfils the condition.
In this example, there is an authentication service in the app and the off service might provide methods like a login, check session, log out, etc.
The route guards return a true-false, so simply, an auth service is injected into the guard and it is used to make the check. The route guards can perform side effect as well. So if a user is not authorized, it is possible to redirect them, to a login screen or back to the homepage.
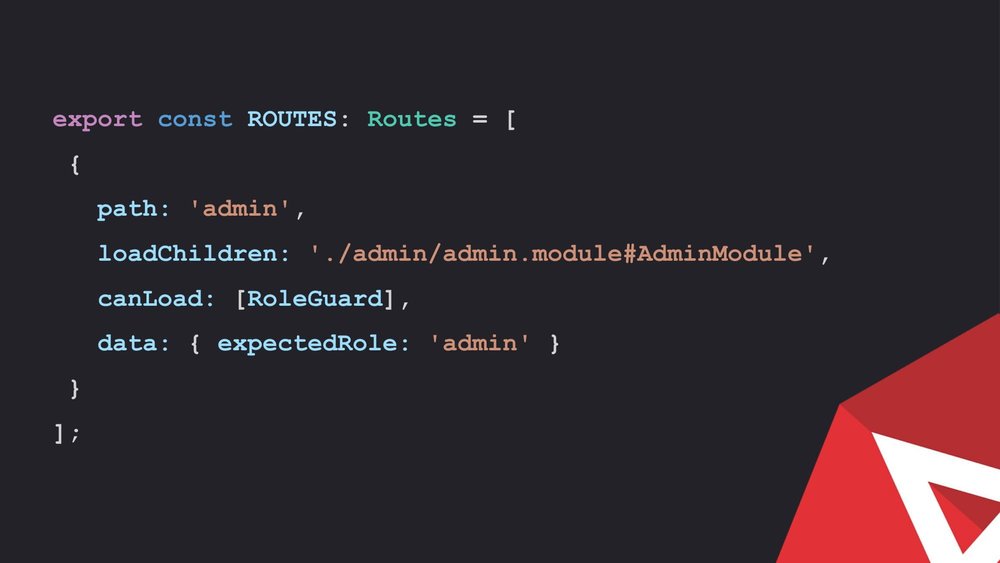
This is another example of route guard. This one is implementing the CanLoad interface. The user permissions and scoped can be verified based on route data.
Async Routing
With async routing, a person can have the portion of the app which might have something a bit sensitive, only be loaded when a certain route is navigated to and before that route is navigated, it is checked whether or not the user should get access to it. it is not a great approach.
A portion of the app code is loaded if the user is authorized. This is checked with CanLoad interface.
This is what it looks like.