
This series of blog posts which I have converted from Youtube videos. I personally have really enjoyed these videos so in order to textually document them, these are essentially some screenshots and rough notes organised.
This particular post is based on the awesome Daniel Figueiredo Caetano & Renee Vrantsidis NGConf2017 talk. It can be found on the link https://www.youtube.com/watch?v=vxJUBgTsLgs
There are several reasons why it is useful to integrate redux into the forms. Some are:
☑ It lowers the maintenance costs of the form setups on large scale applications from moving form setups out of the components, which can be very helpful when dealing with a lot of forms like in enterprise projects.
☑ It centralizes the form data and makes it easier for abstractions or common operations.
☑ It helps make the forms more declarative and template driven, which allows the user to not use them as boilerplate.
☑ It allows the user to use JS functions, which are testable, typeable and extensible.
Example application (dungeons and dragons character creation)
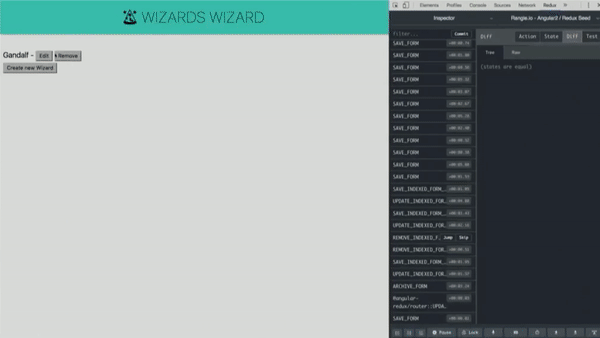
On the left (gif below), there is a redux app tool, so that every single action that is being dispatched, goes to the store and are kept locked there. As the data is typed in, the forms are really responsive, and the business rules are calculated, so the users get the validation errors.
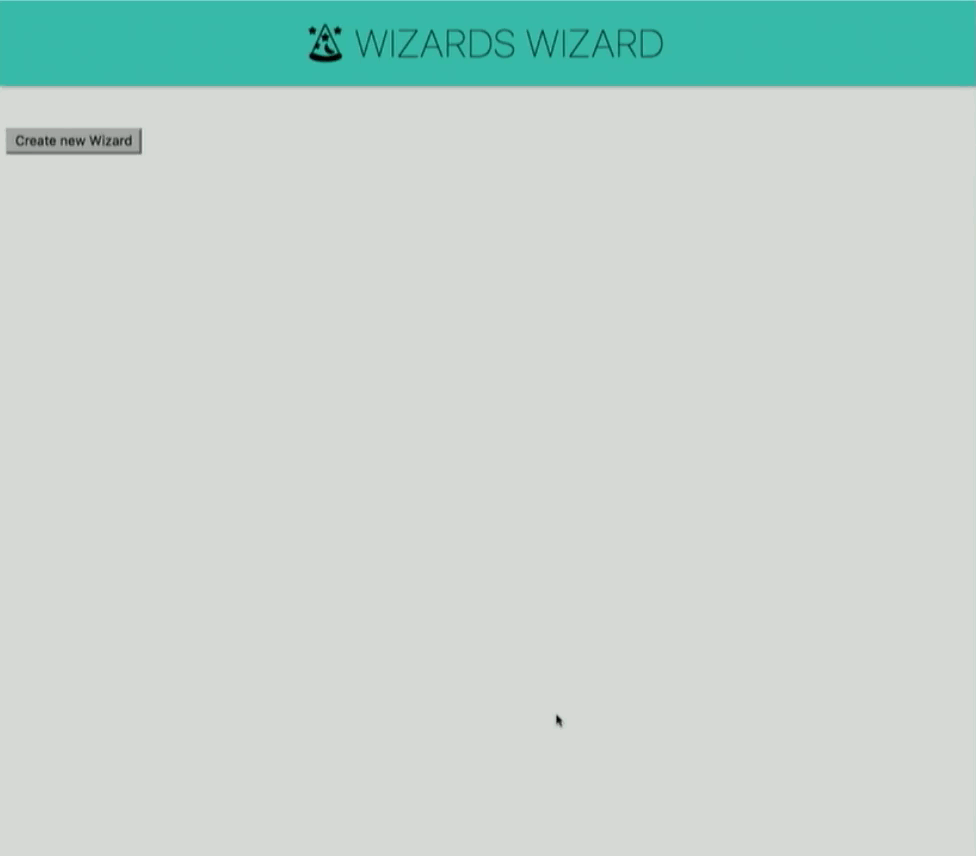
For example, Gandalf, here, is an elf, it not being accepted as ‘lawful evil’, the validation errors tell the user that the elf can only be Neutral, Good and lawful. In the age column, users are given validation errors too, it tells them that the age of the elves cannot be older 800 years. The skills field needs to be filled and without filling it thee users cannot proceed forward.
This post is about adding:
☑ The redux magic into the forms
☑ Adding form data to state
☑ Supporting multi-entry fields
☑ Controlling validation with selectors
Redux, basically gives the data a unidirectional flow.
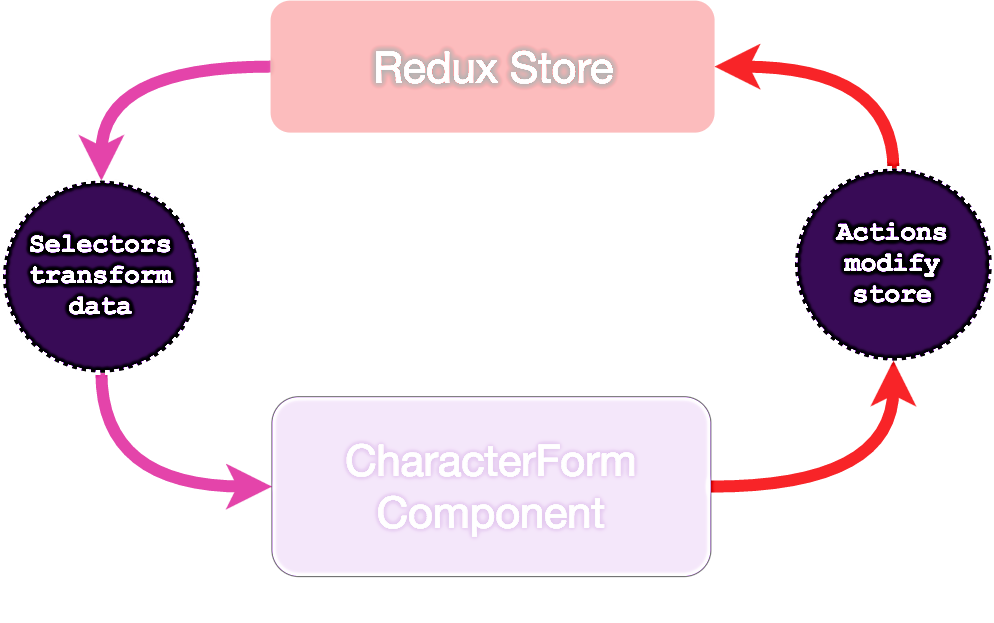
In this cycle, there are certain things that are happening inside the component. These actions are treated, which in turn change the applications state. Redux is the implementation of flux which is a single store. Redux store has every single data of or within the app stored inside it. The selectors receive the data from the redux store and transform them. All the data within the store is computed using these selectors. Then this transformed data is fed back to the components, in order to make validation errors function.
☑ Redux and angular redux are used
☑ NgRx can be used
☑ Ramda is used for some utilities to keep the state commutable for the reducer
☑ Reselect is used for the selectors
Setting up your form reducer and component
One reducer to rule them all
A single reducer is introduced which is capable of handling all the forms so that a single reducer is reused again and again to produce more output.
Export const rootReducer = combineReducers<IAppleStatte>{

Form: formReducer,

});
Plan our structure
The structure of the forms needs to be designed however the user wants it to be on the store. Typescript is leveraged in order to define the shape of the state.
The example below portrays a form interface which defines all the forms of the application (there can be multiple forms) which reuse the same actions and reduces the workload
Export interface Iform { // interface for the form reducer

Character: ICharacter;

}

Export interface Icharacter{// interface for the character form

Name?: string

bioSummary: IBioSummary;

}

Export interface IBioSummary } // a subsection of the character form

Age: number;

Alignment: string;

race: string;

}
Inside the form state, there is a character form, which was also shown above. This form can be checked in any way that the user wants. In the example, this form is grouped in BioSummary; the age, alignment, and race. But, it can be arrays or method objects as well.
Reduce, reuse
Plan any other forms which are required to be added into them from the state. Though, redux, users can reuse all their work by just adding another interface or another property on the form interface.
Export interface IForms

Character: ICharacter ; // state.form.character

Equipment: IEquipment; // state.form.equipment

}

Export interface IEquipment  {

WeaponName ?: string;

weaponType: string;

armorType; string;

}
Setting up Actions
The actions are responsible for changing the state. What is needed here, is to persist the form so that the users are able to compute things out of it.
Export const SaveForm = (path, value) =({

Type: ‘SAVE_FORM’,

Payload: {

Path, // [‘character’] would be form.character

Value,

}

});
A generic action has been defined, it is called, saveForm and the payload consist of the path and the value. The value is t form that in which it is going to be saved. And the path is that where it is required to be saved. This patter is used because if there is another form, the path will be treated as the equipment and not the character and then the same action can be performed.
Create form reducer
Import { path, assocpath, merge } from ‘ramda’ ;

Export function formReducer( state= initialState: IForm, action ) {

Switch (action.type) {

Case ‘SAVE_FORM’;

Const propPath = action.payload.path;

Return assocPath(

PropPath ,

Merge (

Path<string[]>(propPath , state),

Action.payload.value

),

State

);

}

}
In this example, the form state is the type I form and there is a case statement for the state form where the value is taken. And, the property path, that has been defined earlier. The new value will be merged in the new value at the path which was specified.
Create form template
<form #form =’ngForm’ >

<label  for=”name”>Character Name:</label>

<input

Type=”text”

Name=”name”

[(ngModel)]= ”characterForm.name”>

<label for=”age’>Age:</label>

<input

Type=  “number”

Name= ”age”

[(ngModel)]=’characterForm.biosummary.age”>

</form>
The template is created in the same structure that is present in the state. In this example, the binding of thee characterform.name and the ng model. This is due to the values being on the state.
Create Form Component
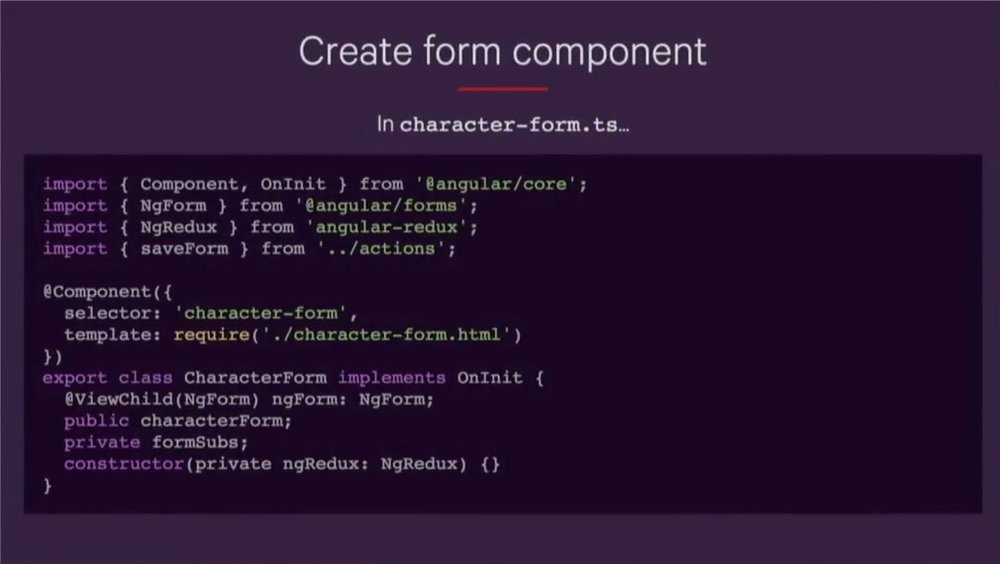
Creating actual Typescript component. The template-driven forms are used along with the child of NG forms so as to gain access to it. Chracterform.name and characterform.biosummary.age are referenced from the paths that were previously defined in the interface when the store was set up. The two of them are needed to be synchronized because it is required to subscribe character form to the store.
Listen and Dispatch
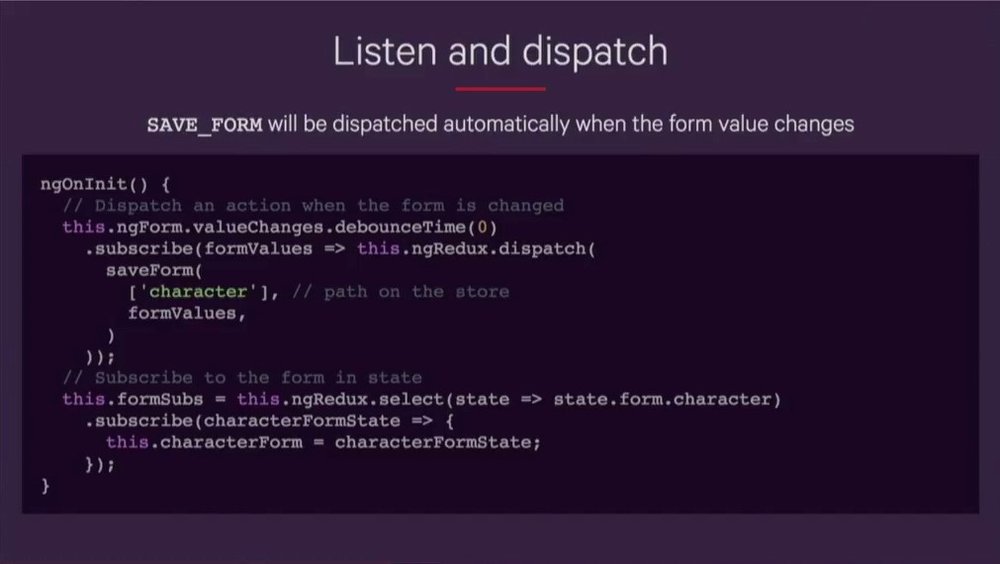
Two subscriptions have been set up here:
↠ The first thing which we are subscribing to is the ng form and to the value changes, which will fire an event every single time that the value of the form changes.
↠ From there, the values are going to be taken and the save form action is going to be dispatched.
This action is provided with the path character because that is going to be the entire character form. All of the new form values of the character form are going to be provided along with the cement state.
A subscription to state is also set up that will write to the character form property in the component. So, that if anywhere else in the application, the change occurs, the character form will automatically be reloaded.
The diagram below shows the character form to be subscribed to the ng form changes and for every single change, it dispatches to save form action. It sends it to the store and that subscription from the store will make the components be notified of the respective changes.

Extending your existing form and form reducer
Multi-entry field
Character: {

Skills: [‘Cllimb’, ‘Knowledge Arcana ‘];

}
It is the field in which the user is able to define how many entries they want. It could be drop down or a nested form of the object inside with its specific validations.
Adding new actions
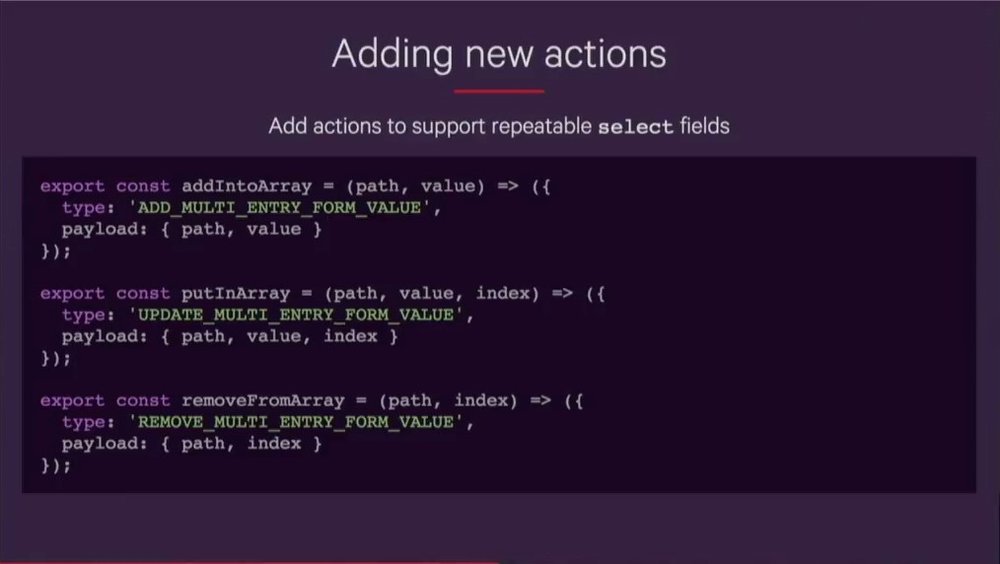
In order to handle storing form data as an array, some new actions are required to be added. In the example given, some actions have been defined for adding a multi-entry form value, updating a multi-entry from value and removing a multi-entry form value.
Add is going to add an undefined item to the array. Items can also be updated or be removed from the array.
Updating the Reducer
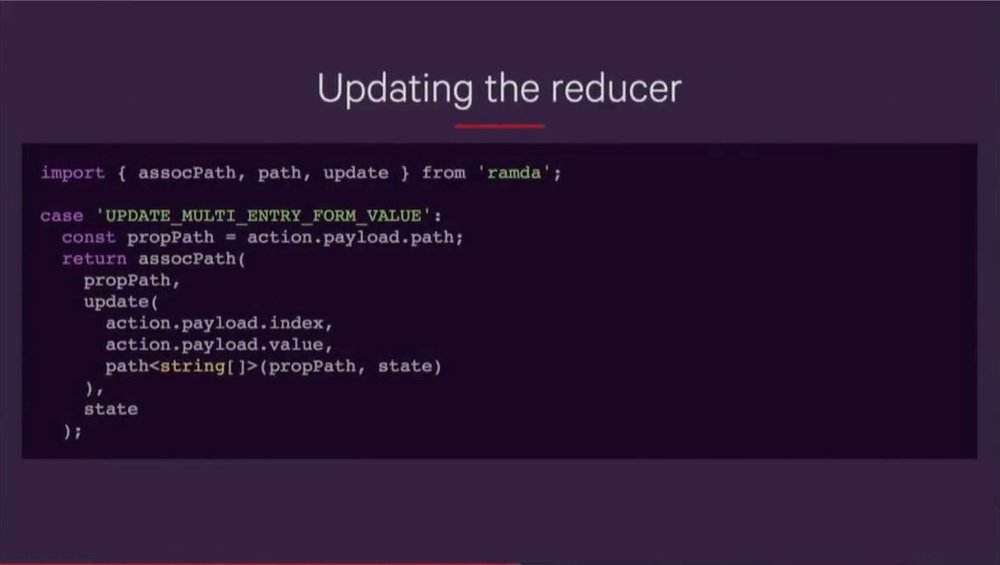
All these generic actions can be in any type of array. In the example below, there is a switch case to perform the update action. And the other two switch cases will be similar and in order to perform removing or adding into the array. The library is rammed up for the new ability because it is required for our functions to be fewer in number. It updates a particular value within the index.
Update our form component

It will dispatch the action that is put in the array. The example given shows the value which is going to be the ‘skill’, index for where are going to place it and the path which will be ‘character and skills’.
Update our form template
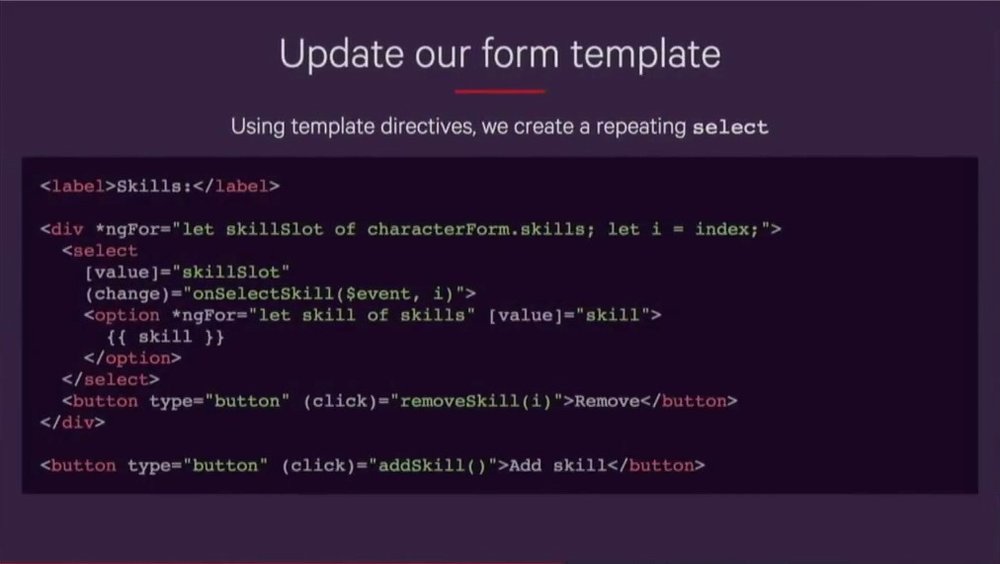
The example below is for the template. It shows how the template goes through every skill. It will generate multiple drop downs. The update action on change is also being dispatched.
Adding validations
Validation as selectors
☑ Selectors can compute data from the store through function composition.
☑ Actions do not need to be dispatched in order to validate fields.
☑ When reselect is used, it gives the memorization benefits.
How selectors work
↠ Selectors chains multiple functions
↠ Each chained function returns a value
↠ The last function in the chain receives all returned values
Creating a character from selector
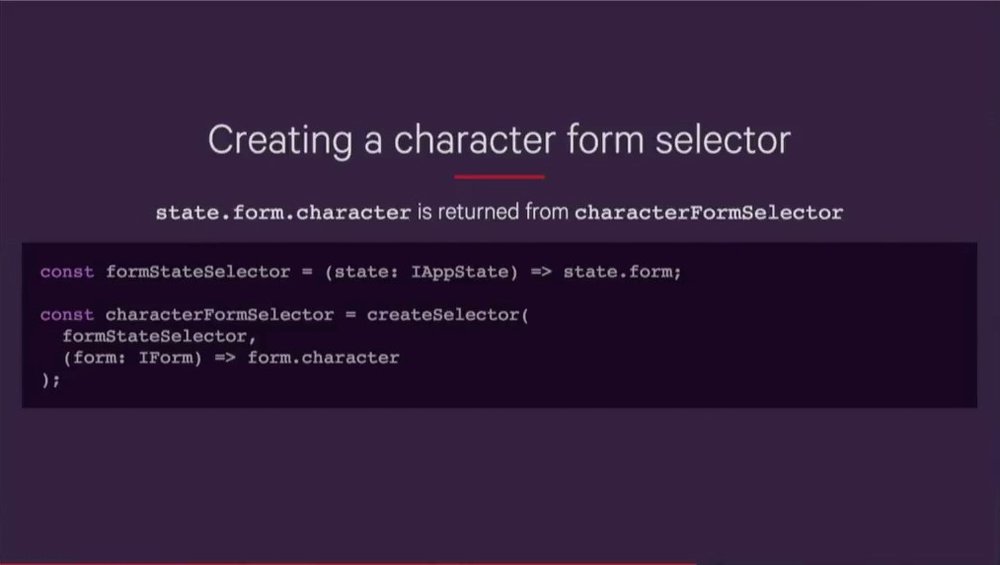
The objective of the selector is just to return the value of the state. In the given example, showing how it is done.
Validating the entire form

Whenever it is required to get the character form, we use character from selector
Add to our component
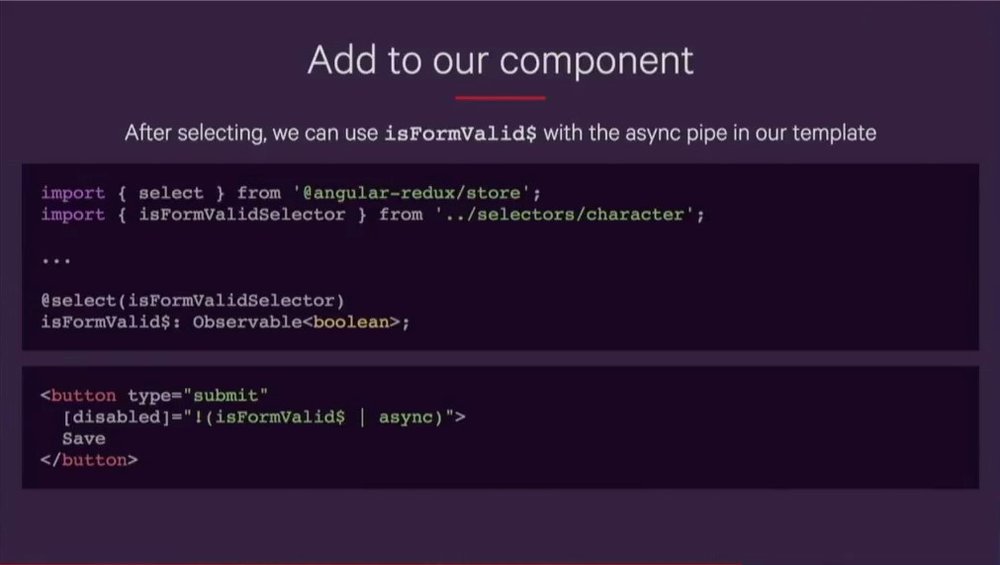
The Boolean can be used in a template to disable or enable the button. In the example below, select is imported form the angular redux. A select decorator is used to access the selector, which will give the observable, which will return a Boolean.
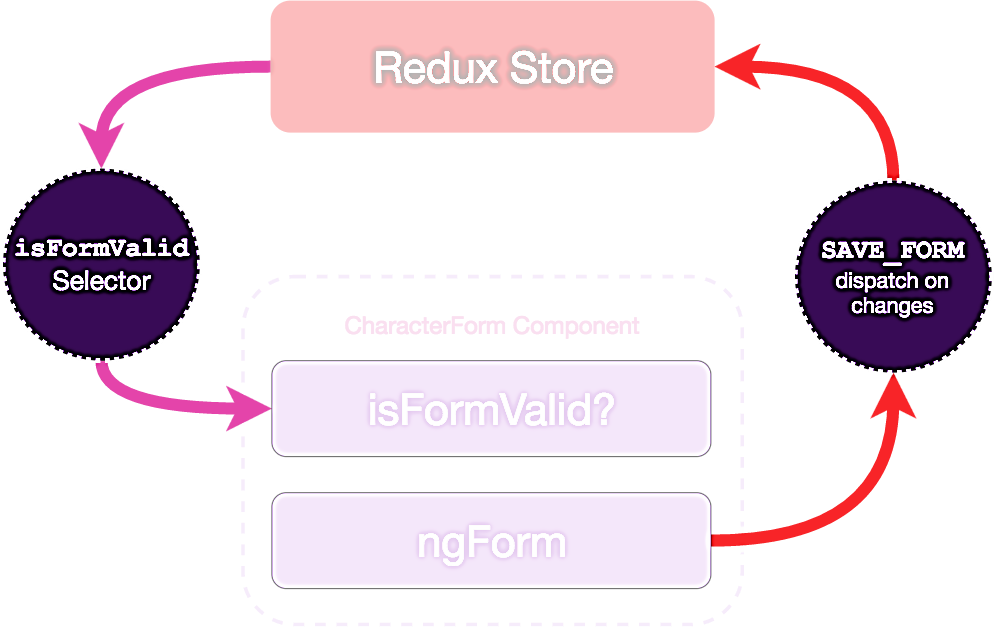
The flow chart below is the modified version with the addition of the selectors. Selectors are put in between the state and the component.
Field-specific validation rules
In the example below, the name length is being evaluated that if it is between 3 and 50.

Update isFormValid

The main valid selector is the name to be piped in. in the example below, the nameValid is defined which is already computed a value.
Adding validation errors


A selector is selected which will return a Boolean true or false, which will then be used in the component.
hi i have a problem with this line : state = initialState: IForm
says that initialState is not recognized.