
This tutorial will demonstrate how to create a new navigation section in your squarespace website which can be used for adding pages in a different language. When navigating pages in a specific language, the user will only see the pages from that language in his or her navigation. Note: This method requires that the developer mode be turned on. All the files mentioned in this tutorial are found on the SquareSpace FTP. Details on how to connect to FTP can be found towards the bottom of this page.
Step One: Define a New Navigation
Open the template.conf file and navigate to the section where the navigation is defined.
"navigations" : [ { "title" : "Main Navigation", "name" : "mainNav" } ]
Add the following piece of code to create a new navigation,
{ "title" : "New Navigation", "name" : "newNav" }
The final result would look something like this,
"navigations" : [ { "title" : "Main Navigation", "name" : "mainNav" }, { "title" : "New Navigation", "name" : "newNav" } ]
A new navigation section will show up in the backend. It will derive its heading from whatever you set the value for “title” in the code above.

Step Two: Create a New Navigation Block
Navigate to the blocks folder in your FTP and make a copy of the navigation.block file in the same folder. Rename the copied file to new-navigation.block.
Step Three: Create Templates For the New Language
Go back to the root of the FTP and make a copy of the site.region file. Rename it to new-language.region. Go to the template.conf file again and navigate to the layouts section.
"layouts" : { "default" : { "name" : "default", "regions" : [ "site"] } }
Define a new template by adding the following piece of code,
"new-language" : { "name" : "New Language Template", "regions" : [ "new-language"] }
Final result would look something like this,
"layouts" : { "default" : { "name" : "default", "regions" : [ "site"] }, "new-language" : { "name" : "New Language Template", "regions" : [ "new-language"] } }
Note: If there is more than one .region file in your theme, you will have to repeat this process for all of them.
Step Four: Point the Navigation Tag to the New Menu
In the newly created .region file, locate the squarespace navigation tag. It looks something like this,
<squarespace:navigation navigationId="mainNav" template="navigation" />
dit it so that the value for ‘navigationId’ is the same as the value of ‘name’ of the new navigation we created in the first step. In this case, it is ‘newNav’. Set the value for ‘template’ to the name of the newly created file in the blocks folder. For this instance, it is ‘new-navigation’. Final result would look something like this,
<squarespace:navigation navigationId="newNav" template="new-navigation" />
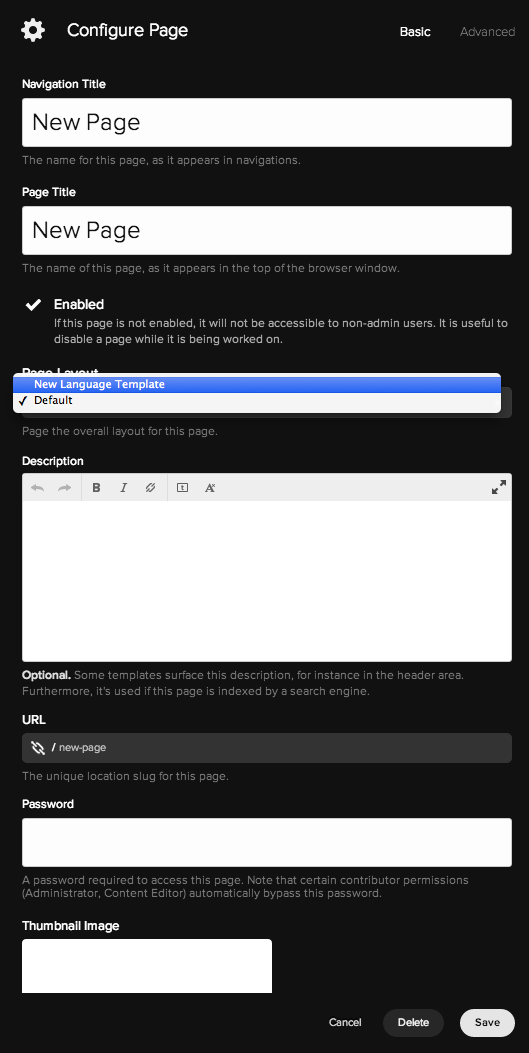
Step Five: Adding Pages
Step Five: Adding PagesWe are all ready to go now! Add pages in the “New Navigation” section that we created in the first step. Once you have added the pages, change their page layout to the “New Language Template”, We created this template in the third step. The page layout option can be brought up clicking on the settings tab on each individual page in the admin area.
Step Six: Add a Language Switching Button
Add a button or link to the header or sidebar of your website which will allow your visitors to switch between the two sections of the website.
Bonus Step: Automatically redirect visitors to the relevant section
The tutorial found here can be used to automatically to redirect visitors to the relevant section of the website based on their browser language.
For any squarespace related queries, ping us here
Do you have an example of a site created with this solution? I would like to see how it navigates.
hey…thanks for your effort!sadly i already get an error message after the first step (template.conf): “could not parse the file contentes properly due to invalid JSON.
can you help me?
awesome method, thank you!would it also be possible to change the link of the logo-image to a specific site? as it is now it always jumps back to the main language…
Hello, great article and easy to follow, which is nice.
Any chance you could expand on the language switching button part, I have no idea how to do that. I guess I could just make the homepage and index page and then they would click into each site, but I don’t like that as much as the traditional language switcher.
That said, I am not sure how easy it would be to get the language switcher to redirect someone to the same page that they were on (without always sending them back to the homepage for example)…
Thanks for a good article!
Nathan
Hello! I am using the Montauk template, followed the directions and ran into troubles with Step 4: Pointing the navigation tag to the new menu. My region files have nothing remotely resembling that code – instead it looks like a CSS. I fear this is why my two navigation bars aren’t reading as such.
Any help is appreciated.
Thanks.
Syed Muhammad Obaidullah this solution is a great hack around Squarespace’s limitation. If you’re looking for a hosted service, that allows you to dynamically switch content without ever touching your site’s core code. I would recommend checking out Localize.js
https://localizejs.com/docs/integrations/squarespace
Does this work with 3 or more languages too?
Yes. It can scale upto as many languages as you want. I have myself deployed it for a maximum of 4.
Thanks a lot for this tutorial! I work with Montauk template and it worked like a charm!How would one approach the language switching button? My site is now in 3 languages, so adding each one of them to menu won’t look good. I’d like to put little flags on the top right corner of each site. Flag would be linked to the index page of each language. However I’m having trouble with positioning the flags: code injection puts them outside the canvas, while i need them inside it… and staying there while scaling the site..
Hello, not sure if you are still active in this discussion or not, but I ran into similar issues with the theme “Avenue.”
This is what I see in my .region file: http://i.imgur.com/kDOweJ1.png
Let me know if you find any solutions. Thanks.
Hi, I am using marquee template, and the same problem happened to me, help!
the region file problem or the page layout problem?
in my case, the .region file , not show any code like this:
Thank you for your help!
Post a picture of what you get.
I need to know how to edit the to . My .region file where the code should be according to this tutorial presents no similar code.
Use a different code editor
Hi. I followed this tutorial perfectly, and everything seems to work, except that the new navigation won’t show up. Even though the translated pages have the “New Language Template” nothing changes. It’s still the norwegian navigation that shows up. I have the Bedford template.
I got it to work. Apparently there was two places in the new-language.region that I had to change to the newNav.
Hi, I’m using the marquee template and I can’t find the “page layout” anywhere…. can i ask you what template you are using? thanks.
Hi there.
This is a really great tutorial, very helpful indeed!
Everything works for me apart from when viewing in mobile, the menu reverts to the default language. Is there anyway to fix this?
Many thanks
James
That might be possible because the template files for mobile might be different from the desktop version. Which template are you working on? And how many .region files do you see when you login through FTP? Also can you please share the link to your website where you implemented this?
I’ve posted a solution further up on the page you might find helpful.
Was a solution ever found for this? I am using the Pacific theme and would love to find a way to use this. I got to the Nav to show in the admin, but not when the pages are clicked the nav is still the main nav – not the new one.
Can you please check all the .region files present in your website for code similar to what I had posted for changing the navigation?
Hi Obaid, in both my .region files I see what mlee21, Flavio Lucas and Joy describes. So I cannot see the string to edit.
I’ve posted a solution further up on the page you might find helpful.
It was amazingly helpful information! Thank you so much as I have wanted to create a sub navigation so badly!
However, there is one problem that occurred on my mobile site. That is, I am using Montauk template. And, my site is prosoriginalbible.com I have built a cover page where you can choose languages (English and Korean) before linking to the main homepage. And, I have created a sub-navigation with Developer mode as exactly explained above. I have used the program called cyberduck. So it perfectly worked on my site as I have two navigation boxes where I can have pages in both English and Korean on each navigation. However, when I go to my site on mobile, even though I selected Korean, it only shows English navigation menu not the other one in Korean. Here’s where I am stuck. I need a help with how to display my second navigation menu (Korean menu) on mobile site.
Thank you.
Hi,
I was able to do this on my page which is absolutely amazing, BUT I have a problem with changing my navigation links and bottom links to the other language.
Basically having multiple languages, not to just translate automatically but to have the same content in nav, and bottom of the page corresponding to the different languages. Any solutions? This would be really helpful!!
Thanks
In the name of God
How are you all? I hope you are having a good day.
Since yesterday I have been trying to change the font of the Arabic division of my site to a more suitable custom font. I have found the web font, downloaded it, and uploaded it to my Custom CSS section. What I want to do is the following for these pages:
http://www.mdarwish.net/index (Cover Page) http://www.mdarwish.net/home-ar (Home page for Arabic version of my site) http://www.mdarwish.net/blog-ar (Actual Blog) http://www.mdarwish.net/portfolio-ar (Page for portfolio containing gallery) http://www.mdarwish.net/about-ar (About Page) http://www.mdarwish.net/objectives-ar (Objectives Page) http://www.mdarwish.net/contact-ar (Contact Page)
Change their font
Make the direction right to left
Remove sidebar 1 and only keep sidebar 2 on these pages.
I’ve been trying to get the ID of those pages and the blog with no success. All I could do until now is:
Upload the font as mentioned
Write the CSS for it with its url in my custom CSS section.
A help would be appreciated.
Hi, is there supposed to be a link to the bonus step, "The tutorial found here can be used to automatically to redirect visitors to the relevant section of the website based on their browser language."?
Thank you so much Muhammad ! This post helped me a lot
Hi! Thanks for the awesome tutorial!
I got stuck in step 4 coz my template doesn’t have the "page layout" option. Does it mean that this method is not applicable to my website? 🙁
Agh! Just caught the stupid mistake I made when updating the codes. My bad. It’s working now! Thanks once again for this clear and useful tutorial! 🙂
Hi Syed,
Thank you so much for posting this code. I followed all of your instructions and the New Navigation section shows up in the backend and I can add all of my French pages to it.
However, all of my navigation links are still to the original language. Do I need to point navigationID= "newNav" in all of the places where it appears in my new-language.region file? It appears in 3 places in my particular .region file.
Thanks for your advice to those of us who are trying to create multilingual sites!
Did you resolve your problem?
I’m also stucked on this Problem and to create a Button to redirect the pages doesn’t change the language of the navigation so at the end it is kind of useless…
I guess I am doing something wrong in the process buecause till the step 5 it is everything OK but then I don’t get how to make it work.
Any light on the matter??
Thanks!
Hey Enrique,
Can you explain a little more what problem you are facing? Are you looking to add a button that will let you switch to the other language? Or is the new navigation not showing up in your template?
Best,
Obaid
Seriously awesome!!!
You just saved me a huge headache. It works perfectly!
Hi There ! this works amazingly !
I was wondering, is there any chance when im on one language that the logo points to the HOME of that language, and when im on the other, the same logo points to the other ?
thanks !
Yes this is possible. You would need some coding knowledge for this however. You would basically need to go into each of the .region files of your template and set the link of the logo image to the respective home-pages.
This works great, thanks!
Like some of the other comments here how do we add a language switching button/tab with flags or text?
Any help greatly appreciated.
Just add a button/image to the sidebar or footer of your website and you’d be good to go. Unless your template allows editing the header (I don’t believe there is any squarespace template right now that does), you’d have to go the .region file and code a button/tab there.
Did everything described here, even triple-checked every step, and I still don’t have access to the Page Layout option in the page settings. No idea what’s going on…
Figured it out. 🙂
can you post your solution?
Any solution for the footer? Would need a dual footer too for multilingual sites.
This is a little late but hopefully it will be of help to you 🙂
Squarespace templates now usually have a separate file for footer called "footer.region". You would basically repeat the first step and create another new navigation for the footer and put in a new "new-footer.region" file and connect it to the new language template already created in step 3. That should do the trick!
This doesn’t seem to work. I created a new footer-mylang.block file, and pointed to this in my new language .region file. However, the footer is still universal across both languages.
My theme does not use the footer navigation, btw. So all of the footer content is created in the editor itself.
What am I missing?
Hi Syed,
Well done! Great Tuto, very clear and precise.
Can you just tell me what will be the steps to add a button on the header,
Thank you
Hi, is this SEO compliant? I don’t want google to lower the rank of my website.
https://support.google.com/webmasters/answer/182192?hl=pt-PT&ref_topic=2370587
Thanks!
I seem to have the same problem as a few other commenters that I don’t have the option for "page layout" as in step five. I checked each other step multiple times, have checked to make sure that my .region file is updated with the new navigation. I am able to add pages to my "new navigation" block, and view the pages themselves on the website, although there is no visible navigation for them. When I am viewing these pages, the navigation menu does not change to reflect the "New Navigation" that I was hoping this would provide. I’m sure I must just have missed something or done something wrong, but I’m not really sure where! I’m using the Pacific template if that is any help.
Thanks!
I’m stuck here too. With the Montauk template.
hi syed, why is it my .region file does not at all v look like in your example and a tag like <squarespace:navigation navigationId="mainNav" template="navigation" />
is nowhere to be found, thank you in advance, håkon
mine is like this:
{.if template.mobileStylesEnabled} {.end} {squarespace-headers} {.if template.mobileStylesEnabled}{.or}{.end}
Menu
{.section website}
{.if logoImageUrl}{.or}{siteTitle}{.end}
{.section location}
{.if addressLine1}
{addressLine1}
{.or}
Street Address
{.end} {.if addressLine2}
{addressLine2}
{.or}
City, State, Zip
{.end} {.if websiteSettings.contactPhoneNumber}
{websiteSettings.contactPhoneNumber}
{.or}
Phone Number
{.end}
{.or}
Street Address
City, State, Zip
Phone Number
{.end}
{.if siteTagLine}{siteTagLine}{.end}
{.if logoImageUrl}{.or}{siteTitle}{.end}
{.end}
{.section collection} {.background-source-video?}
{@|apply sqs-video-background.block}
{collection.title}
{collection.description}
{.or} {.section mainImage}
{collection.title}
{collection.description}
{.end} {.end} {.end}
{.section collection}{.equal? typeName "products"}{.section categories}
• Filter{.if categoryFilter}: {categoryFilter}{.end}
• All {.repeated section @} {@} {.end}
{.end}{.end}{.end} {squarespace.main-content}
{.section website} {.if socialAccounts}
{@|apply sqs-social-links}
{.end} {.end}
{squarespace-footers} {.if template.mobileStylesEnabled}{.or} {.end}
got it – mac app text edit render that file like that. instead, use f.ex bbedit and all clear
got it now, excellent solution, thank you syed!!!
I’m having the same problem!
can you tell me what you did?
I cannot thank you enough for posting this tutorial! It worked like a charm and gave me a clearer understanding of what can be done with Squarespace.
hey
newbie here
im using filezilla and sublime text to make these edits, but i can’t see how to duplicate the navigation blocks?
i figure out the duplication of the blocks.
I’m not at step four:
<squarespace:navigation navigationId="mainNav" template="navigation" />
i dont see "TEMPLATE" after the "mainNav" code
did i do a step incorrectly before this one?
That confused me a bit too as my region file didn’t use the same wording as the tutorial. I’m using the Mojave template and—in the current version at least—there’s no template in /blocks called navigation.block.
In Mojave, it’s header-nav.block so I duplicated and renamed it header-nav-mynewlanguage.block. Then in my new region file, I edited line 101 to <squarespace:navigation navigationId="mynewlanguageNavigation" template="header-nav-mynewlanguage" />. I had to do something similar for mobile.block, and I’ve posted my instructions for mobile navigation separately above.
Maybe navigation.block is using a slightly different name in your template too. Hopefully that helps!
For anyone running into problems displaying translated navigation on mobile, this worked for me to get primary and secondary navigation displaying correctly:
Correction: Any references to mobile.nav or mobile-mynewlanguage.nav should actually use the extension .block instead. And the additional steps I outlined only work in conjunction with Syed’s brilliant and helpful tutorial above… obviously. 🙂
Thanks for this Giulia ! but i do steps and it works BUT my mobile navigation is "empty" (no links inside) . Any help ?
Hi,
Do you have a solution for the IMPACT template? It doesn’t have a navigation.block?
Thanks,
Denise
Hi,
Many thanks for the tutorial.
It all works fine but for the fact I use the Harris template, which doesn’t have the template part of the line – <squarespace:navigation navigationId="mainNav" template="navigation" />
I partially change the relevant line but the header doesn’t redirect.
<body id="{squarespace.page-id}" class="{squarespace.page-classes}{.if website.logoImageUrl} has-logo-image{.or} has-site-title{.end}{.if website.siteTagLine} has-tagline{.end}{.if showCart} has-cart{.end}{.if websiteSettings.userAccountsSettings.loginAllowed} has-user-accounts{.end}{.if website.socialAccounts.0} has-social{.end}<squarespace:navigation navigationId="newNav">{.if items.0} has-primary-nav{.end}</squarespace:navigation><squarespace:navigation navigationId="newNav">{.if items.0} has-secondary-nav{.end}</squarespace:navigation>{.section collection}{.background-source-video?} has-video-background-banner{.end}{.end}" data-controller="BodyClassController">
If I add the template code to this line it does redirect but the header disconfigures. Any suggestions about what to de?
Many thanks
Alan